M.2 SSDs have revolutionized data storage with high-speed performance and compact form factors. However, their installation requires careful attention as the components can be delicate.
Traditionally, M.2 SSDs have been secured to motherboards using small screws. While effective, this method can be time-consuming and prone to damage or connection errors, especially within server hardware. Hence, to counter these issues of M.2 screws, tool-less M.2 board latches have emerged as a safer, more convenient, and efficient alternative.
This article will cover the basic information about M.2 screws and their selection considerations, then take a deep dive into M.2 latches, exploring their benefits, design types, mounting options, and installation guide. By understanding these components comprehensively, you can make informed decisions to install your M.2 SSDs and protect them from damage.
1. What is an M.2 Screw?
An M.2 screw is a tiny, specialized fastener designed to secure M.2 solid-state drives (SSDs) to motherboards, which is why it may be referred to as an M.2 SSD screw or M.2 drive screw. The most common type of M.2 screw has an outer thread diameter of 2mm and a standard thread pitch (distance between the threads) of 0.4mm.
By holding M.2 SSDs firmly in place, the M.2 screw can prevent it from dislodging even when exposed to vibration during operation or maintenance, ensuring a reliable connection at all times. But why can’t you use just M3, M4, or any screws found in motherboard packs to secure M.2 SSDs? Compared to other options, M.2 screws much smaller in size. This allows them to fit into various compact electronic devices, including sleek laptops and notebook PCs which usually can’t accommodate bulkier screws for M.2 SSD mounting.
In turn, M.2 screws became the standard choice for M.2 SSDs. While some users may also rely on adhesive thermal pads to eliminate the need for tools when mounting M.2 SSDs, but the installation may not be as stable and the adhesive pad may even leave sticky residuals on the motherboard. On the other hand, certain manufacturers, such as Fivetech, offer M.2 board latches as a tool-less alternative for M.2 mounting screws, which can be so much more reliable and convenient. Thus, we’ll delve deeper into this alternative later on.
2. How to Select M.2 Screws?
To ensure a successful M.2 SSD installation, it is crucial to consider factors such as size measurements and material when purchasing screws.
M.2 Screw Size & Measurement Considerations
While the diameter of M.2 screws is standard, they still come in different sizes and lengths. An incompatible or poorly fitted M.2 screw can lead to serious issues, including loose connections, damage to the SSD or motherboard, and potential system instability. The key considerations for M.2 screw measurements include:
- Length: The length of conventional M.2 screws usually falls between 2mm to 6mm, while some manufacturers provide different custom options. Just remember that the screw should be long enough to securely fasten the SSD without protruding excessively.
- Thread Pitch: Although the standard M.2 screw thread pitch is 0.4mm, some manufacturers may offer non-standard pitches for custom orders. Nonetheless, the thread pitch or spacing between threads must be compatible with the mounting holes, ensuring optimal engagement with the motherboard for stability.
- Screw Head & Drive Type: The screw head (flat, round, pan, etc,) and the drive type (slotted, Phillips, hex, etc) should be chosen based on the tools available, as well as the desired torque and surface finish. Most will opt for a flathead screw since it gives a sleeker look.
M.2 Screw Material Considerations
M.2 screws can be made with various metals, including carbon steel, stainless steel, aluminum, and more. There are also screws made out of nylon or other types of plastic. The choice should depend on the operation’s environmental conditions and required mechanical performance, including:
1. Tensile Strength: Different materials offer varying strengths and durability. For instance, stainless steel and zinc alloys have greater strength, which can help prevent breakage during installation or removal.
2. Weight: Heavy components within the motherboard may cause inconvenience during operation or maintenance, which is why most would select alloys that incorporate lightweight aluminum for a balance strength-to-weight ratio of M.2 screws.
3. Corrosion Resistance: Exposure to moisture or chemicals can cause screws to degrade over time, compromising their stability. Choosing corrosion-resistant materials like stainless steel helps ensure long-lasting performance in demanding environments.
4. Temperature Tolerance: Even with a high-performance heat sink, the temperature within a motherboard may fluctuate during operation, which is why the materials for M.2 screw should be heat-resistant, like those of nickel alloys or high-grade stainless steel.
5. Electrical Conductivity: The conductivity of an M.2 screw material can impact signal integrity and grounding in electronic systems. Depending on the application, consider brass and aluminum for better conductivity, or non-conductive nylon for insulation.
With this in mind, here is an overview of the common M.2 screw material options for your reference:
| Material | Tensile Strength | Weight | Corrosion Resistance | Temperature Tolerance | Electrical Conductivity | Common Applications |
| Carbon Steel | High: ≈400-600 MPa | Heavy | Poor: prone to rust if untreated | Moderate | Low | General electronics where strength is primary and corrosion is not a major concern. |
| Stainless Steel | High: ≈500-800 MPa | Heavy | Excellent: resistant to rust and oxidation | High | Low | Ideal for high-humidity or corrosive environments such as outdoor devices; also commonly used in premium motherboards. |
| High-Tensile Steel | Very High: ≈900-1200 MPa | Heavy | Moderate: coating may be required | High | Low | Applications requiring extreme strength and durability, such as precision or high-vibration machinery. |
| Aluminum | Moderate: ≈100-300 MPa | Very Light | Good: can oxidize but form a protective layer | Moderate | Good | Lightweight electronics and portable devices, where weight reduction is crucial. |
| Brass | Moderate: ≈300-500 MPa | Moderate | Good: resistant to rust but can tarnish | Moderate | Moderate | General electronics requiring good conductivity and some corrosion resistance. |
| Titanium | Very High: ≈800-1200 MPa | Light | Excellent: highly resistant to corrosion | High | High | Aerospace, medical devices, and high-performance electronics where strength, low weight, and durability are essential. |
| Nylon | Low: ≈50-100 MPa | Very Light | Excellent: won’t rust or corrode | Low | Non-conductive | Used as an insulative component to prevent short circuits in sensitive electronics.
* Note nylon should not be used with equipment that radiates heat for prolonged periods due to the risk of deformation. |
3. How to Install M.2 Mounting Screws?
Typically, M.2 SSDs come bundled with a compatible screw in the packaging. However, if yours doesn’t include one, or you need a replacement, then you may purchase M.2 screws individually or as part of an M.2 screw kit from electronics stores and online retailers. M.2 screw kits are usually preferred for their convenience since they often include M.2 mounting screws of various sizes and lengths, and sometimes even M.2 standoff screws that serve as spaces, providing you with options for different motherboard configurations.
Once you have the M.2 screw and compatible screwdriver prepared, you may consult your motherboard manual or manufacturer’s website to install the SSD card. Here’s a general overview of the installation process:
Step 1. Locate the M.2 Slot
M.2 slots are typically labeled and can be found near the PCIe slots or RAM slots. If your motherboard has a heatsink covering the M.2 slot, gently remove it by unscrewing any retention screws. Some motherboards may also have multiple M.2 slots, so read the label or manual to ensure you’re using the right one for your SSD type (either NVMe or SATA).
Step 2. Prepare the M.2 Screw and Other Components
If you are using a screw kit, you will have to unfasten the M.2 mounting screw and other necessary components from the kit before using them. For instance, for a motherboard without pre-installed standoffs, you will have to take one of the M.2 standoff screws from the kit, then position it into the motherboard to elevate the SSD to the correct height and proceed with the next step. If only have shorter M.2 screws at hand, you may also add a nut before screwing the SSD in to provide additional thread engagement as a temporary alternative, then get a screw with the right size later on for a better fit.
Step 3. Position the SSD
Carefully hold the M.2 SSD by its edges. Align the notch (key) on the SSD’s connector with the corresponding key in the M.2 slot. The SSD should be inserted at a slight angle, usually around 30 degrees, into the slot.
Gently push the SSD into the slot until it is fully seated. You’ll feel it slide into the connector. Avoid using brute force. If the SSD seems stuck, check to see if it’s aligned properly before proceeding. Once it’s fully inserted, the opposite end of the SSD will be raised slightly above the motherboard.
Step 4. Secure the SSD with the M.2 Screw
Gently press down on the raised end of the SSD until it lies flat against the motherboard. The screw hole on the SSD should align perfectly with the standoff or screw hole on the motherboard. Now, insert the M.2 mounting screw and carefully tighten it using a screwdriver according to the manufacturer’s recommendations.
While M.2 screws are effective for securing M.2 SSDs, it’s important to exercise caution during installation to avoid damaging the delicate components. Overtightening the screw can strip the threads or warp the SSD due to mechanical stress.
Users should also be careful with compatibility issues when they have to replace M.2 screws or obtain new ones. There are variations in screw hole sizes and thread pitches between different M.2 SSDs and motherboards, so the options you have may be limited to your current hardware configurations.
Additionally, some motherboards have a limited number of screw holes for M.2 slots, which can restrict the placement options for larger SSDs and also cause issues for applications that require multiple M.2 drives.
To address these limitations and obtain more flexibility, many users are beginning to opt for M.2 board latches as an M.2 screw replacement for mounting SSDs onto their motherboards.
4. What is an M.2 Board Latch & Why is It the Best M.2 Screw Alternative?

An M.2 board latch is a quick-release fastener designed to secure designed to secure M.2 SSDs to a motherboard. With a spring-loaded latch mechanism, it can clamp onto the SSD, holding it firmly in place without the need for screws. Its features offer several advantages over traditional M.2 screws, including:
- Tool-Less Card Installation & Reduced Risk of Damage: M.2 card installation is simple and intuitive with board latches. Users can easily insert the card into the slot and secure it by releasing the latch, eliminating the issue of overtightening or subsequent damages.
- Reliable Structure for Secure Fit: Their sturdy vertical design further prevents accidental loosening or detachment of the SSD, ensuring reliable performance even in demanding environments with vibrations. This minimizes the risk of data loss or system instability caused by unreliable connections, unlike traditional screws that may accidentally fall off and become lost when loosened.
- Operational Efficiency: The front-facing quick-release mechanism of M.2 board latches allows users to effortlessly secure or detach the SSD with a simple pull, significantly reducing the installation time, especially for motherboards with modular designs.
- Versatility: M.2 board latches combine the functionality of M.2 screws and standoffs. Their design elevates the SSD off the motherboard, improving airflow and thermal dissipation. They are also available in various mounting options and compatible with a wide range of M.2 SSD sizes. Moreover, some designs even enable the installation of multiple cards or heat sinks, offering flexibility in system configurations.
In short, M.2 board latches offer a convenient, efficient, and reliable solution for securing M.2 SSDs with a superior user experience than screw-based installations.
5. Types of M.2 Board Latch Designs
Reputable manufacturers like Fivetech may offer a wide range of innovative M.2 board latch designs with features catering to different applications, from simple, single-card setups to complex, multi-card configurations. By understanding the different types of M.2 board latches and their unique characteristics, users can select the optimal solution for their specific needs.
Basic M.2 Board Latch
The standard M.2 board latch has a simple yet effective design that offers quick and easy installation. It features a vertical structure and a push-to-lock/unlock mechanism that securely holds the M.2 card in place, ensuring mechanical stability to prevent accidental dislodgement.
Double M.2 Board Latch
For systems requiring multiple M.2 cards, the Double M.2 Board Latch provides a convenient solution. With a multi-layer design, this type of board latch allows for the simultaneous installation of two M.2 cards in a compact space. The layers on the Double M.2 Board Latch can even accommodate M.2 cards of different lengths, enabling greater versatility during installation.
Buckle Lock Double M.2 Board Latch
The Buckle Lock Double M.2 Board Latch combines the functionality of M.2 card installation and heat sink positioning. Once the M.2 card is held securely by the board latch, users can rotate the buckle to attach the heat sink and lock it in place. Not only does this integrated design simplify installation and save space, but it also improves the motherboard’s overall thermal capacity to ensure optimal performance.
6. Options for M.2 Board Latch Mounting
M.2 board latches can be mounted onto the motherboard with four main methods: screw-in, snap-in, snap-in turn, and SMT. The optimal mounting method depends on factors such as the specific design of the motherboard, so if you are unsure which to select, make sure to consult the manufacturer.

- Surface Mount Technology (SMT): This mounting method involves soldering the SMT M.2 board latch directly onto the motherboard’s surface. The advanced automated equipment used in SMT mounting ensures precise placement and a strong connection while enabling consistency and efficiency for high-volume production.
- Screw-In Mounting: Screw-in board latches feature a threaded hole at the bottom. Once the latch is positioned over the designated area, a screw can be inserted from the other side of the motherboard to fasten it in place. This enables a strong, reliable hold between the latch and the motherboard, especially for applications exposed to frequent mechanical stress or vibrations.
- Snap-In Mounting: With its interlocking tab, a snap-in board latch can be mounted onto the motherboard without tools or riveting machines. By applying gentle pressure, the tab will narrow while squeezing in the designated hole on the board, then widen to snap securely into place after it has been properly fitted through. This is a particularly quick and easy method to provide a durable connection between the latch and motherboard.
- Snap-In Turn Mounting: Similar to snap-in mounting, the tab beneath a snap-in turn board latch must be fitted through a designated hole to be snapped in place. After it is positioned, the board latch can be rotated by 90˚ to lock it on the motherboard. This method is more user-friendly and offers flexibility for modular designs.
7. Guide to M.2 Card Installation with Board Latches
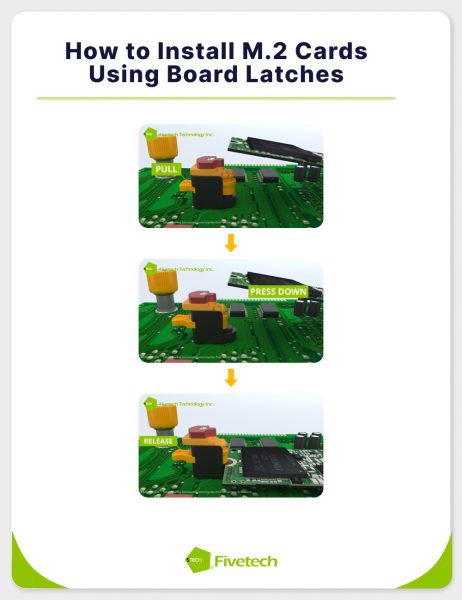
Installing an M.2 card with a board latch is a straightforward process. Here is a step-by-step guide to help you:
1. M.2 Board Latch Mounting: Identify the slot on the motherboard where the M.2 SSD will be installed and mount the board latch at an appropriate location using one of the aforementioned methods (screw-in, snap-in, snap-in turn, or SMT) to complete the preparation.
2. M.2 SSD Card Alignment: Position the M.2 SSD card between the motherboard slot and the board latch, ensuring the card’s keying is properly aligned with that of the slot.
3. Secure the M.2 SSD Card: Gently pull the M.2 board latch to slide back its cover and gently press the M.2 card into the slot until it clicks into place, applying even pressure to ensure it is fully seated. Then, release the latch to secure the card firmly.
4. Place Additional M.2 Card or Heatsink: If necessary, repeat step 3 to place another M.2 SSD card on a double board latch. For heat sink installation with a buckle lock board latch, pull up the buckle on top to place the heat sink, then rotate the buckle and push it back to lock the heat sink place.
By following this guide, you can effortlessly install your M.2 SSD cards without the hassle of screws or the risk of over-tightening. There are also some precautions you have to keep in mind:
- Avoid Excessive Force: The M.2 board latch works with minimal force, so make sure to operate gently when inserting or removing the M.2 card. This will help you avoid bending or damaging the delicate pins or connectors on the card and motherboard.
- Avoid Touching the Card Connectors: Handle the card by its edges to prevent damage as debris or grease from your fingertips may affect the connection reliability.
- Prevent Electrostatic Discharge (ESD) Protection: Ensure proper grounding using an ESD wrist strap or discharge the residual electricity by holding the power button for 3-5 seconds before installation to protect the components.
Need More Help?
If you encounter any difficulties or have specific questions about the installation process, consult the manual for details or contact Fivetech for further assistance.
8. How to Select M.2 Board Latches?
Similar to M.2 screws, you must consider certain factors to ensure optimal performance of M.2 board latches:
1. Design Compatibility: While M.2 board latches can usually accommodate various motherboard slot configurations and M.2 SSD sizes, you still have to verify whether they are compatible with the board latch design and its mounting mechanism to ensure proper alignment. These specifications can be found in your motherboard and M.2 board latch manuals.
2. Material Quality: M.2 board latches require durable materials to ensure long-lasting performance and reliable retention of the M.2 SSD. Thus, manufacturers like Fivetech usually make board latches with high-quality stainless steel for optimal strength. They also incorporate lightweight, heat-resistant plastic for their M.2 board latch covers. This offers a comfortable grip and insulative properties to prevent scalding or electrical hazards during operation.
3. Ease of Use: A well-designed M.2 board latch should prioritize ease of installation. Look for a latch with a simple, intuitive mechanism that requires minimal effort to secure the M.2 SSD. With a user-friendly design and tool-less operation, the latch can help prevent accidental damage to the SSD or motherboard, while making the process more efficient.
4. Additional Features: Based on the specific requirements of your application, you can consider choosing M.2 board latches that offer multiple card slots or heat sink positioning. These features can boost flexibility in system configurations to enhance the motherboard’s overall performance and functionality.
9. Streamline SSD Installation with Fivetech’s M.2 Board Latches
M.2 board latches offer a simplified, tool-less installation process for your M.2 SSD without the risk of overtightening or compatibility issues from standard M.2 screws. This alternative reduces the chance of damaging delicate card or motherboard components while ensuring a hassle-free setup.
As a leading fastener manufacturer, Fivetech offers a comprehensive range of high-quality, user-friendly components, from Our M.2 board latch solutions to streamline your M.2 SSD installation process. Beyond basic M.2 board latches, our selections include Double M.2 Board Latches for multi-card convenience to maximize your storage capacity and Buckle Lock Double M.2 Board Latches that integrate heat sink installation features to facilitate heat dissipation within your motherboard.
On top of that, Fivetech’s products — from board latches to captive screws, thumbs screws, quarter-turn fasteners, folding handles, and more — are all ISO-certified and RoHS-compliant, guaranteeing adherence to the highest quality standards within the industry. Explore our catalog to browse our full range of M.2 board latches or contact our experts for customized solutions today!
Experience the Convenience and Effectiveness of M.2 Board Latches
")


")
")